What if you can create a sortable, filterable WooCommerce product table that is mostly customizable with drag & drops functionality?
If you have an e-Commerce business that runs an online store, then you must know that there is a dedicated shop archive page in WordPress that is to use to showcase individual products. But depending on your requirements, that might not be the most efficient way to showcase your products on your site.
Moreover, using the default WooCommerce feature can make your site copycat which might not be considered as standard for your business model. It’s always vital to find an optimal tool for creating WooCommerce products table that can be used to design and customize your site whenever you are in need. This article will go through a step by step process to make you understand regarding WooCommerce product table.
Using a Quality WordPress Plugin
Though it’s very tough to create a WooCommerce product table using the default WordPress ecosystem, it’s a matter of fate that WordPress supports a ton of plugins for creating WooCommerce product tables. All these plugins are built to add extra functionalities so that users can easily customize and optimize WooCommerce product tables.
However, here lies another problem like you may get confused to find out a quality plugin out of the flooded plugins for creating WooCommerce product tables on your eCommerce site. Moreover, when you get tons of options in a combined way from the different developers, there might have the risk of compatibility issues.
And if that sounds like the situation you are in, you are in the right place as a fortunate one. Because Ninja Tables from WPManageNinja comes up with this amazing feature to solve your confusion regarding WooCommerce product tables creation. I’m going to show you how to create WooCommerce product tables using the powerful plugin named Ninja Tables.
In this article, I am going to discuss the Ninja Tables plugin and try to show how it relates to creating WooCommerce product tables for an eCommerce site.
A Short Forewords to Ninja Tables and WooCommerce Product Table
In WordPress, you will get a huge choice of plugins that can help you to create tables on your website. But you will hardly find quality plugins with large scalability that can provide tons of services alone. Ninja Tables plugin is such type of rare plugin that can be used in so many purposes simultaneously.
You can create almost any kind of tables using this excellent plugin. It’s more like you can get functionalities of multiple plugins within a single plugin. As I said earlier, as a scalable plugin, Ninja Tables v3.5.0 comes up with a new awesome feature that is WooCommerce integration.
From now, using the Ninja Tables plugin, you don’t require to install and use any other plugin to create WooCommerce product tables. This will ultimately reduce the burden of purchasing, installing a new plugin, and make your site more optimized as you don’t need to use extra plugins.
Along with other basic generic tables to advanced table creation, you can now able to create WooCommerce product tables on your eCommerce store. Now, let’s take a look at how can you create WooCommerce product tables on your site.
How to Create WooCommerce Product Tables Using Ninja Tables
To create a smooth WooCommerce integration, you need to choose first a WordPress theme which is WooCommerce compatible. Using a theme that is built-in with WooCommerce integration could be a great option for you. Because this will ensure best-fitted styling on all the eCommerce pages that will help you to provide a great UX capacity.
Next, you should come to the plugin installation part. As you are running an eCommerce store, I assume that you have installed successfully the WooCommerce plugin and added adequate products according to your required category.
[N.B: WooCommerce integration is a pro feature of Ninja Tables plugin. Hence, if you want to create a WooCommerce product table, you are required to purchase the pro version of the plugin.]
Now, you want to create dynamic WooCommerce product tables and show the products you added using the WooCommerce plugin.
Install and Activate Ninja Tables Plugin
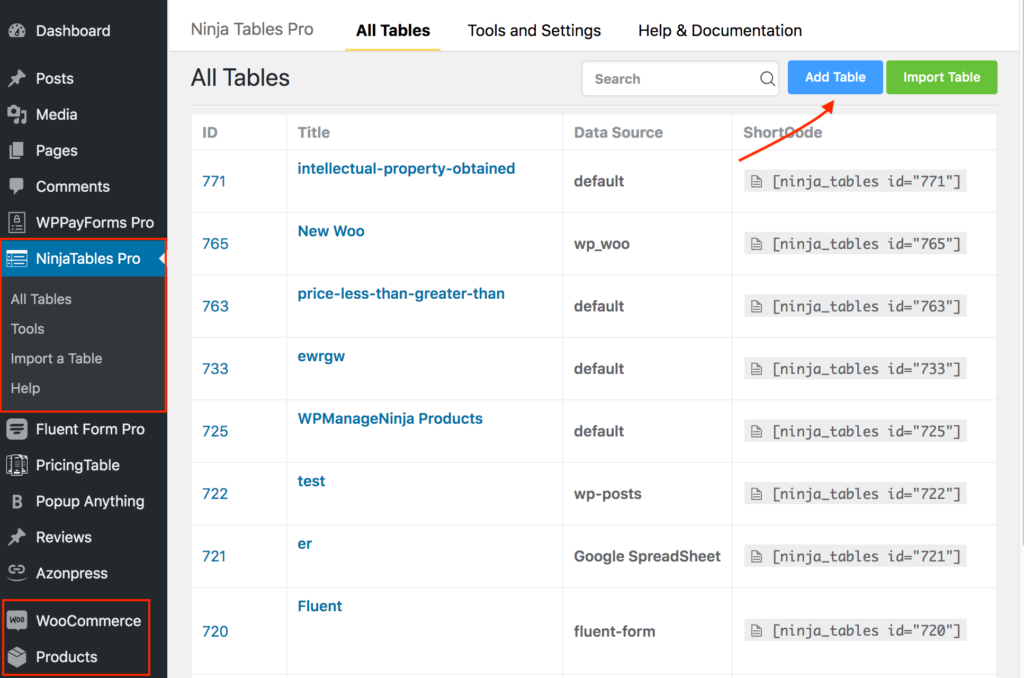
To create a dynamic WooCommerce product table you need to purchase Ninja Tables Pro plugin. Then you should install and activate the plugin accordingly. After successful activation of the plugin, you will get the access of plugin’s dashboard.
Next, to create a WooCommerce product table, click on the Add Table button located on the top right corner of the plugin’s dashboard.
Next, a pop-up will appear with multiple options of table creation. Then, click on the WooCommerce Table option from the left sidebar. Later you will find an input field for proving the name of the plugin.

In the same page of that pop-up, along the input field in the below, you will see a number of options out there for configuring the WooComerce product table according to your product inclusion using the WooCommerce plugin.
Staying on the same page, you can select products by category, tags, and type. If you want to show all types of categories, you don’t need to select anything. You can hide the stock items on your WooCommerce product table by checking the Hide out of stocks items option. You also can choose the initial order item from the dropdown options located in the below. Here products can be shown in ascending or descending order following by the different categories or tags. Finally, click on the Create Product Table button located at the bottom of the page.
Once you click the Create Product Table button, you will notice, the system will create a dynamic WooCommerce product table based on your preferred configuration. Here in this table, we added all the columns as we didn’t choose any specific one. Let’s take a look at the back-end of the created WooCommerce product table.

Now, you get your WooCommerce table within the Ninja Tables plugin with a single click. Apart from the special features for WooCommerce, you will get all the generic features available while creating a WooCommerce product table.
As you integrated WooCommerce with Ninja Tables, you will get three different tabs with several options relating to the WooCommerce product table. These features of three tabs will help you to enrich your WooCommerce product table creation.

The first tab is Appearance Settings and using this tab you can control another four different features. You can show and hide card details before the table and after the table. You also can show cart and checkout buttons using the first tab.
The next button is the Query Settings tab which is used to modify if you need to have on the existing setup. You can limit the product demonstration by customizing the configuration. Here, features can be enabled and disabled as well using this setting option.

Here in the above I only select three categories by using checkboxes. In the same way, I choose product type as single. Here you see that you will find the amount associated with the respective category, tags, and type.
The third tab is Add New Column and used to add a new column in the existing table. You will get all the necessary options out there for creating a new column on your WooCommerce product tables. As we aren’t creating any additional column, we are keeping it blank.

Additionally, in this Add New Column section, you will get more option for making your table more dynamic using Dynamic Column Data Settings option. Here you can use Post Meta, ACF field, Shortcode/Computed Value and so on.
These are the three core features for WooCommerce integration. Now, let’s see the preview of the table so far that is created by the plugin.
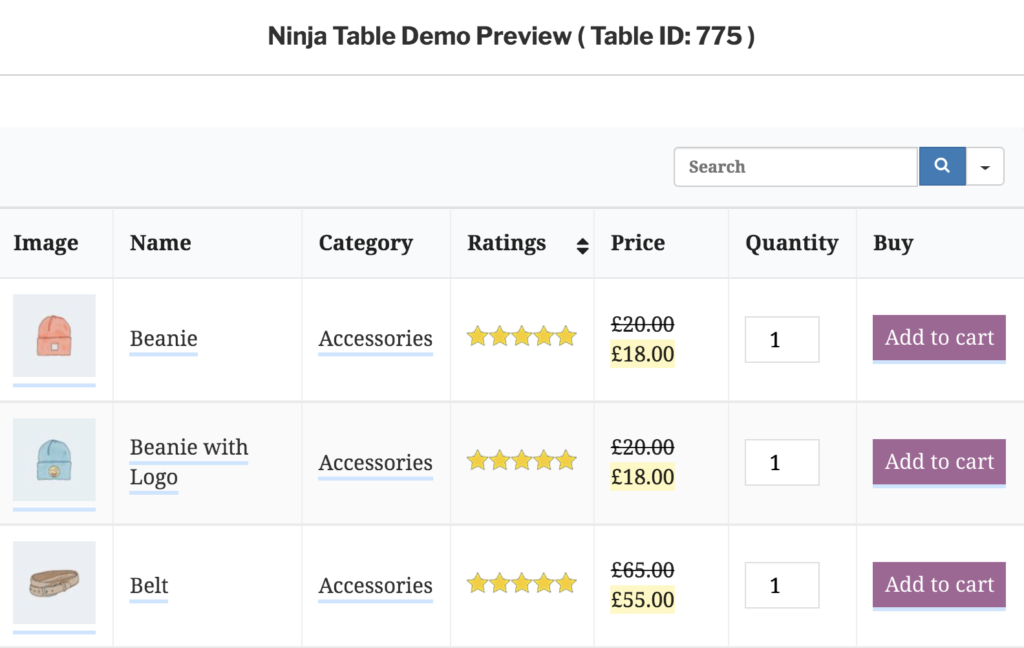
This is what the structure that is created by the plugin without any extra effort. Apart from these core features for WooCommerce, the most important factor is you can get and use all other basic to dynamic features into your WoooCommerce product table.
Next, I will show you how does this WooCommerce product table enhance the user experience, and trigger a revenue search for your WooCommerce business. Let’s talk about that specific issue…
When you click on the product title on the created table, you will see that respective product page will open up with the detailed information. This will help users to make an informed decision.

In the product detailed page, you will see two different buttons. One is a Description that simply deals with the generic information and another one is Additional Information that will provide you more relevant information about the product. In the bottom of the page, you will see a separate section that deals with the related products.
When a user clicks on the Add to Cart button, a cart summary will be placed automatically over the respective table and you will see a cart icon adjacent to the Add to Cart button. This will help users to see the summary and the necessary information of the purchase.

If you enable the sidebar widget on your website, you will find a sidebar cart section beside the Add to Cart button where you can see the summary of the products that he wants to purchase. In this case, you don’t need to go to the cart page.

In the sidebar cart, you also can use cross icon if you want to delete any product item. Or you can go to the cart page or directly checkout page as well. If you want to sort table column, you can do sort columns in ascending or descending order.
N.B: For enabling the ascending and descending sorting, you have to make sure that you’re using that column as a numeric data type.
You also can sort products based on category as well just by clicking on that specific category.
Furthermore, as soon as the user add or remove any product from the cart, it will update automatically. If you increase the items, you will see that the sum of payment has updated according to the item number your given. You can easily view ordered products, set or reset quantity, and eventually, after confirming, click on the Add to Cart button.
Now, to pay for the respective product items or complete the purchase, you need to go to the purchase page. Ninja Tables can take you to the purchase page in two different ways. You can either go to the purchase page directly by clicking on the Checkout button located on top of the WooCommerce product table, or you can find the checkout option after going to the cart page by clicking the View cart button.

If you click on the View cart button, it will take you to the purchasing cart. In the cart page, you can delete the product you want and proceed to the ultimate checkout page. If you have any coupon code, you can use the coupon code using this page.

Once you click on the Proceed to checkout button, you will be taken to the checkout page where you can place the product order. Here, you will get a form and you need to provide the personal credentials by filling the form. The top part of the page bears an option for the coupon code. If you have a coupon code, you also have an opportunity to provide the coupon code by clicking the Click here to enter your code text.

After providing all the information, then you need to click on the Place order button.

Once you click on the Place Order button, then it will take you to the payment page where you complete the total purchase order by providing the payment related credentials.
These are the easy step by step process of creating the WooCommerce product tables and how to use them using Ninja Tables plugin. All these features you can simply by activating a single plugin on your website.
Conclusion
If you want to create WooCommerce product tables and make them more dynamic, Ninja Tables plugin could be the best solution out there for you. Apart from generic advanced table creation feature, you will manage WooCommerce product tables on your site. Simply you can say tons of features are integrated with a single plugin.
Furthermore, using this awesome plugin, you will get extensive documentation facility with dedicated support. I hope the article helped you so much to understand how can you create and manage WooCommerce product tables easily without any hassle.
If you haven’t subscribed to our YouTube channel, do subscribe to our YouTube channel to get WordPress-related tips and tricks. Also, follow us on Twitter and Facebook.
The post How to Create a Woocommerce Product Table appeared first on WP Manage Ninja.